Introduction
In this tutorial, we will show you how to make a video autoplay when a page loads in Divi. Additionally, we’ll ensure the video plays in a continuous loop. This engaging feature can enhance user experience and engagement on your website.
Prerequisites:
- A WordPress website using the Divi theme.
- A video file that you want to use on your web page.
Step 1: Upload Your Video
- Start by logging in to your WordPress admin dashboard.
- Navigate to the “Media” menu and upload the video you want to use. Remember the file’s name as you will need it later.
Step 2: Create a New Page in Divi
- Now, let’s create a new page where you want to add the autoplaying video.
- Go to the “Pages” menu and click “Add New.”
- Give your page a title and click “Use Divi Builder.”
Step 3: Insert the Video Module
- In the Divi Builder, insert a new row by clicking the “+ Add Row” button.
- In the row, add a “Video” module.
- By default, you might see a YouTube video. Remove it.

- Click the “Upload” button and select your video from the media library.
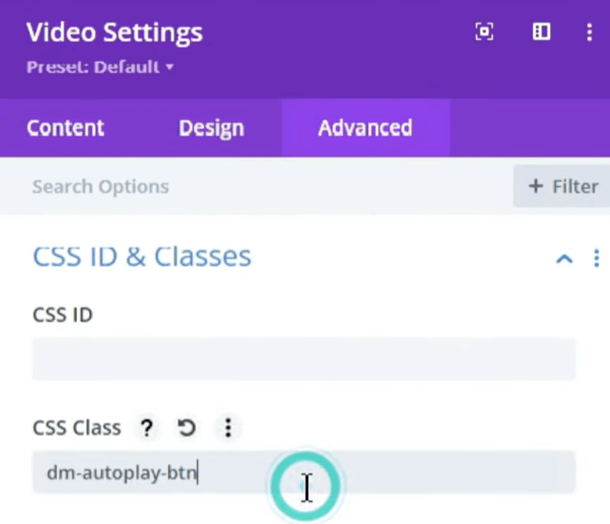
- Ensure that your video module has a unique class name, which we’ll use later to target it. You can set this in the module’s settings.
Step 4: Adding the Autoplay and Loop JavaScript
- To make the video autoplay and loop, we’ll use JavaScript. Open a code editor or notepad and paste the following JavaScript code:
document.addEventListener(“DOMContentLoaded”, function() {
var videoBoxes = document.querySelectorAll(‘.dm-autoplay-btn .et_pb_video_box’);
if (videoBoxes.length !== 0) {
videoBoxes.forEach(function(videoBox) {
var video = videoBox.querySelector(‘video’);
if (video) {
video.muted = true;
video.loop = true;
video.setAttribute(‘playsInline’, ”);
video.play();
}
});
}
});
- Make sure to replace
your-video-module-classwith the actual class name you set in your video module.
Step 5: Insert the JavaScript Code
- Go back to the Divi Builder, and within the Video module, click the “Code” tab.

- Paste the JavaScript code you copied in the previous step into the “Content” field.
- Save and exit the module settings.

Step 6: Save and Publish
- Save and publish your Divi page.
- Exit the Visual Builder.
Step 7: Test the Autoplaying Video
- When you load the published page, you’ll see that the video starts playing automatically.
- It will also loop continuously, providing an engaging user experience.
Conclusion: You’ve successfully learned how to make a video autoplay when a page loads and loop continuously in Divi. This can be a valuable addition to your website, particularly if you want to grab your visitors’ attention with an eye-catching video. Enjoy enhancing your website’s user experience with this feature. If you found this tutorial helpful, please consider liking and sharing it.